INSTALL » История » Версия 42
« Предыдущее -
Версия 42/45
(Разница(diff)) -
Следующее » -
Текущая версия
Владимир Ипатов, 03.03.2018 19:11
INSTALL
OVERVIEW | INSTALL | OPERATIONS | LICENSE
ОБЗОР | УСТАНОВКА | ОПЕРАЦИИ | ЛИЦЕНЗИЯ
Get the ISO image
Download the distribution disk, ready to install: Download ISO-image
To access it you should register
Burn the ISO-image on the disk or prepare a bootable flash-drive
Windows
You can burn the ISO-image using writeable CD-ROM and any available program for burning disks.
You can also prepare a bootable flash using program Rufus:
In rufus interface choose in "Device" your flash drive.
Create a bootable disk using : DD-image and tap on CD-ROM icon and choose ISO file.
Linux
You can burn the ISO-image using writeable CD-ROM and any available program for burning disks.
You can prepare a bootable flash-drive. For this use any available tool, for example, unetbootin.
When it will ask for "type of a system", you should set Debian of version ... and set the path to the ISO-image file.
You can also th write ISO-image directly to flash-drive:
dd if=/path/to/iso of=/dev/sdX bs=4k
Where /dev/sdX - path to the block device file. which is pointing to a flash.
(To find which block device you need, insert the flash-drive and run "dmesg" in terminal - at the tail of the output you will see the information about the flash-drive plugged in).
Minimal System Requirements
In real case you must choose hardware in according to real objectives.For testing purposes minimal system requierements is:
- 4 GB RAM
- 50GB HDD
- 1Gbit ethernet for DRBD link (if you setup 2 or more nodes)
- Hardware Virtualization support: Intel VT or AMD CPU (if you want to run the Windows instances)
For enterprise use both nodes mush have the same configuration (CPU power, RAM, volume and speed of disk system).
System install
First node setup
Before setting up, link nodes to LAN with a cable. Detach all other network cables during setup.
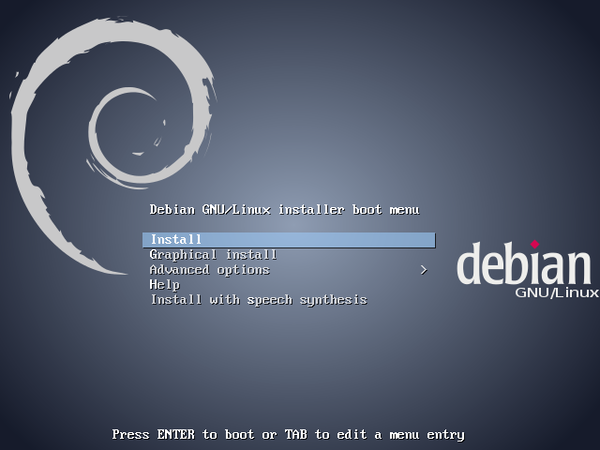
Next boot the first node from installation image.
In welcome scrin choose Install.
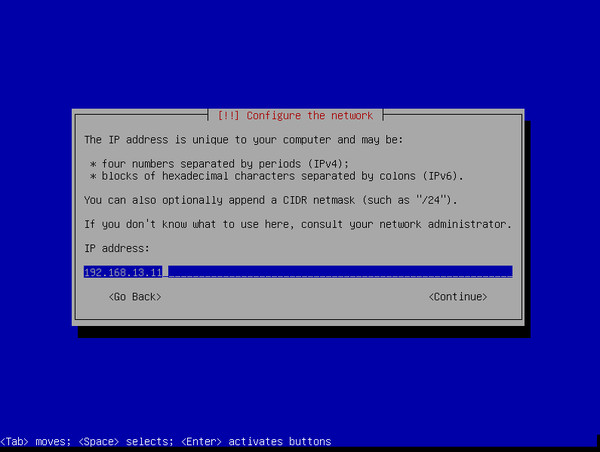
Specify a static IP address for the LAN connection (you can use any free ip from your LAN. In our case it is 192.168.13.11. Tap <Continue>
Next specify the network mask and tap <Continue>.
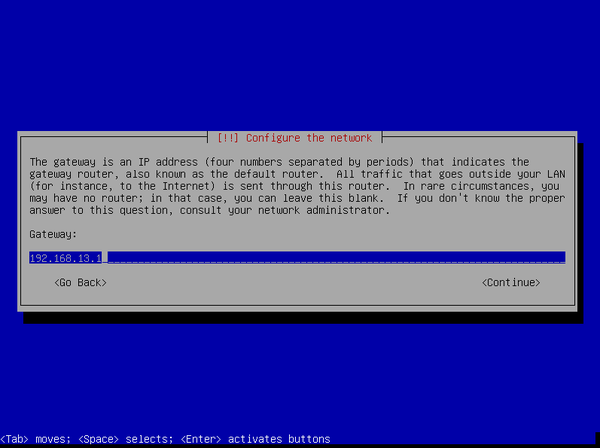
Input your gateway address and tap <Continue>
Input your name server address and tap <Continue>
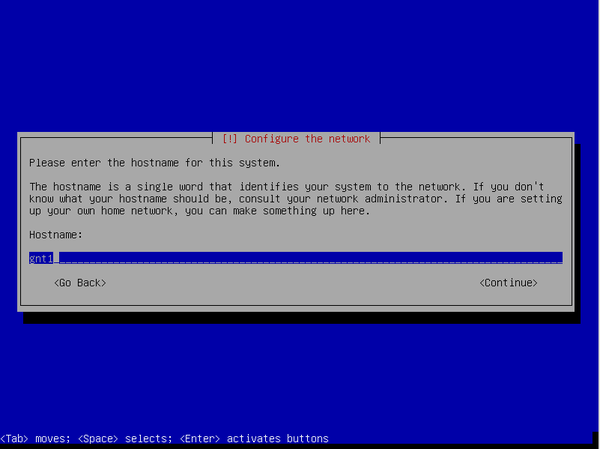
After address setting go to node naming.
In SCI nodes names are gnt# (e.g. gnt1, gnt2, etc.)
NOTICE: Nodes names MUST ending with number on the end, starting from 1.
In the Hostname field specify the node's name, gnt1 or gnt-1
"1" means this will be the first node of a cluster.
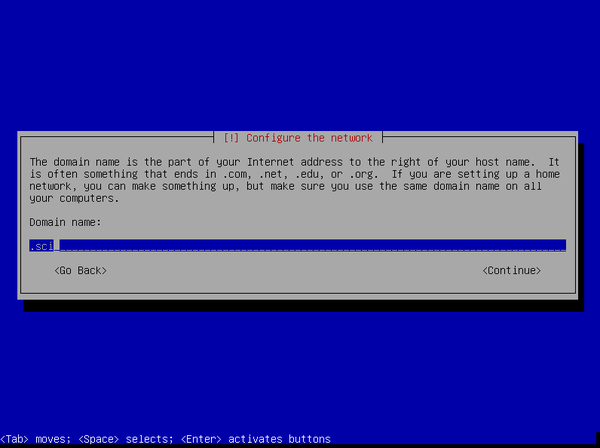
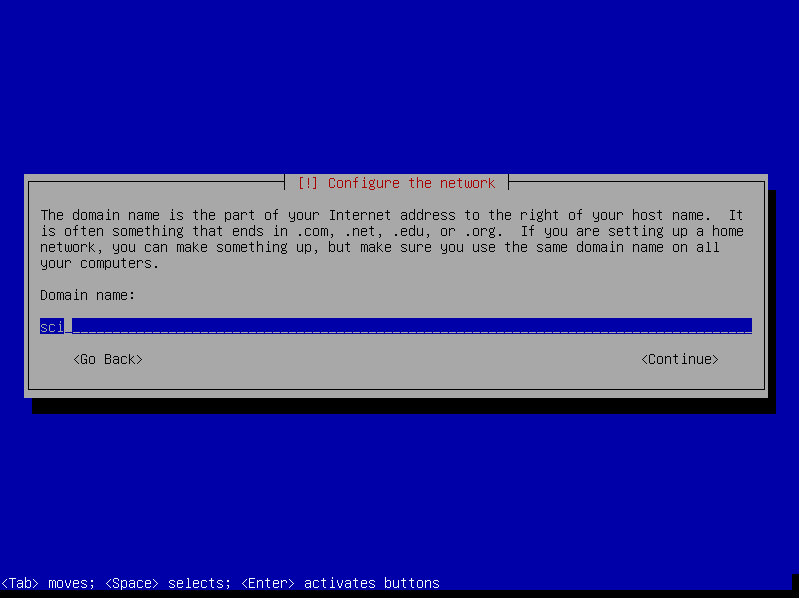
Specify domain name in the Domain field. If you have domain in LAN, specify it, if not, we recommend to set it to "sci"
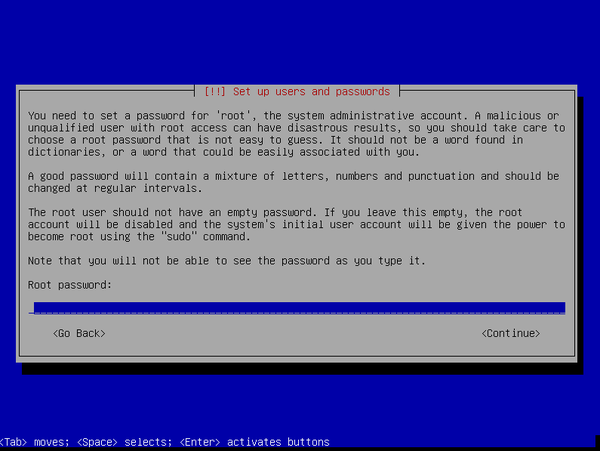
Next specify root password twice
Do not use too weak password!
After setting root password we go to hard disks partitioning.
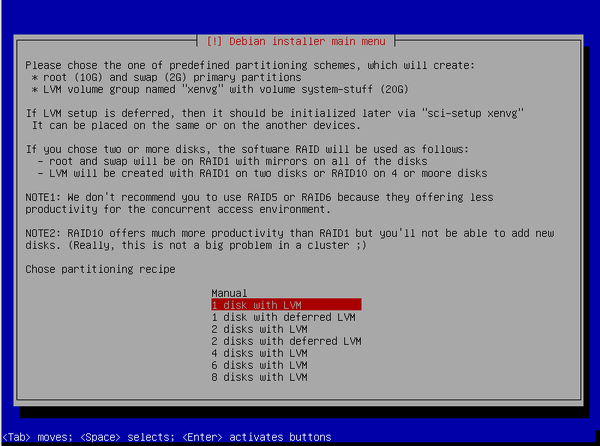
The installer will present several types of automatic partitioning.
If you want to use Software RAID, choose
2(4,6,8) disk with lvm - in relation to number of hard disks.
For two disks RAID1 will be used, for more disks RAID10 will be used.
RAID10 - the recommended RAID level to use along with virtualization.
If you use hardware RAID, choose
1 disk with lvm
If you have a server with two types of disks, for example, 2 SATA drives and 8 SAS drives (bare or under hardware RAID), we suggesting to do a initial setup at whole on the SATA drives with "*2 disk with lvm*" template, and after initialization of a cluster, add SAS disks manually as additional LVM VG.
This procedure is described in OPERATIONS.
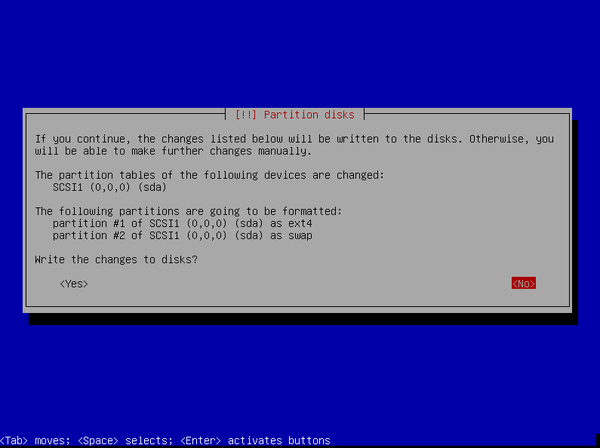
If you encounter the questions about deleting the old partitions and abщut software RAID creation, then confirm this.
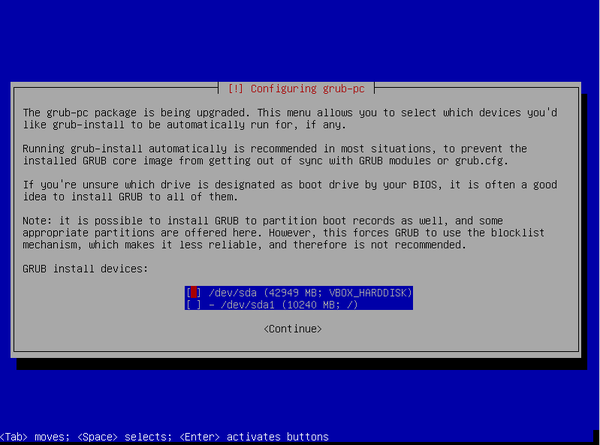
After some packages install, you must choose disks to install GRUB bootloader
Check all underlying physical drives (not partitions and not Software RAID volumes!), where the system was installed.
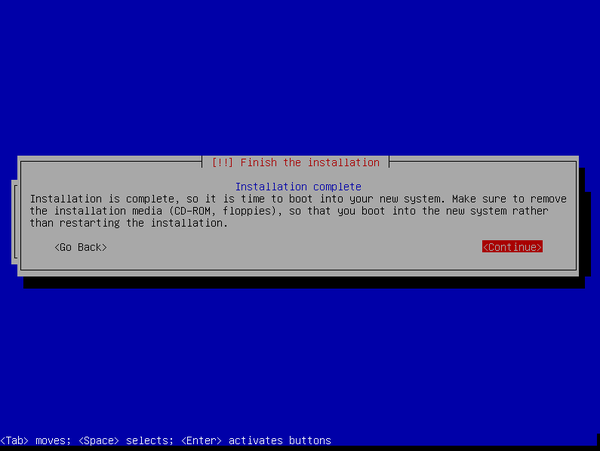
After bootloader install system will install rest of packages and finishes the install.
Eject install media and tap <Continue>. The system will be reboot in installed OS.
Second node setup
Specify the node's name, for example, gnt2 or gnt-2 (like the first node).
Spesify the same root password as on the first node.
Setup the time
Check that both nodes shows the same time.
# date
Thu Mar 12 12:23:10 MSK 2015
If not so, the set it with te following command:
# date -s "12 MAR 2015 12:23:00"
Configure a backbone (the internal link between nodes)
Do not plug off the nodes from the LAN.
Link the nodes with a second cable via their free Gigabit network adapters, check that these adapters "link" LEDs are lit (if the LEDs are present).
This interlink will be used for disk data sychronization and internal cluster communications.
If some oter ethernet cables, other than backbone and LAN) are connected to the nodet at this moment, then you should plug them off for the time of backbone setup.
After the links arise, run the following comand on the each node (you can do it in parallel or sequental):
sci-setup backbone
The result:
root@gnt-1:~# sci-setup backbone
Node number: 1
LAN interface: eth0
Waiting 30 seconds for links to be up
Backbone interface: eth3
Up and test backbone

Waiting for backbone to get ready (MAXWAIT is 2 seconds).
          inet addr:10.101.200.11  Bcast:10.101.200.255  Mask:255.255.255.0
ok.
After setting up it on both nodes, check the link. Run the following command on the first node:
ping 10.100.200.12
root@gnt-1:~# ping 10.101.200.12
PING 10.101.200.12 (10.101.200.12) 56(84) bytes of data.
64 bytes from 10.101.200.12: icmp_req=1 ttl=64 time=0.263 ms
64 bytes from 10.101.200.12: icmp_req=2 ttl=64 time=0.112 ms
^C
--- 10.101.200.12 ping statistics ---
2 packets transmitted, 2 received, 0% packet loss, time 999ms
rtt min/avg/max/mdev = 0.112/0.187/0.263/0.076 ms
Intialize the cluster
On the first node run
sci-setup cluster
The configuration wizard will ask for the address of a cluster in the LAN:
root@gnt-1:~# sci-setup cluster
Cluster domain name will be gnt.
Cluster IP will be 10.101.200.10 on the interlink.
We recommend to set it to some unbound LAN IP address,
but it is safe to simply press ENTER.
Set cluster IP [10.101.200.10]:
If at this moment you will specify any free static IP-address in the LAN, then in the future you will be able to connect the cluster controlling module via this IP.
It is useful, but not obligate and not influent on your ability to control the cluuster. You can simply press ENTER and the controlling module will take the address from the backbone.
Configuration wizard will check ping to the second node and will ask you to accept it's ssh key and to enter the root password to it to retrieve and check it's configuration parameters.
Connecting to Node2 via 10.101.200.12
You will be prompted for a root password...

The authenticity of host '10.101.200.12 (10.101.200.12)' can't be established.
ECDSA key fingerprint is 6a:5a:78:fa:af:c1:23:97:87:9f:66:46:94:7e:f2:f5.
Are you sure you want to continue connecting (yes/no)?
Enter "yes"
root@10.101.200.12's password:
The password to the second node.
After all checks will succeed, the wizard will print the cluster's configuration parameters:
########################################
Parameters detected:
Domain name: example.sci

Master network interface: backbone

Cluster name: gnt
Cluster IP: 10.101.200.10

Node 1 name: gnt-1
Node 1 IP: 10.101.200.11
Node 1 LAN IP: 192.168.11.28

Node 2 name: gnt-2
Node 2 IP: 10.101.200.12
Node 2 LAN IP: 192.168.11.29
Proceed with cluster creation [y/n]?
If all is right, enter "y" and press ENTER to create a cluster.
Refilling sci.conf
Creating empty /root/.ssh
Fullfilling /etc/hosts
Fulfilling default /etc/ganeti/networks
Set random vnc password for cluster: miotaigh
add sci repo in apt sources
Initializing cluster
Tuning cluster
Adding the second node
-- WARNING --
Performing this operation is going to replace the ssh daemon keypair
on the target machine (gnt-2.example.sci) with the ones of the current one
and grant full intra-cluster ssh root access to/from it

The authenticity of host 'gnt-2.example.sci (10.101.200.12)' can't be established.
ECDSA key fingerprint is 6a:5a:78:fa:af:c1:23:97:87:9f:66:46:94:7e:f2:f5.
Are you sure you want to continue connecting (yes/no)?
During the process of adding the second node into a cluster, you will be asked again to accept it's ssh key and to enter the root password.
Enter "yes" and then the password to the second node.
At the end you will see the output of a cluster disgnostic command:
VTue Jun 28 18:37:06 2016 * Verifying cluster config
Tue Jun 28 18:37:06 2016 * Verifying cluster certificate files
Tue Jun 28 18:37:06 2016 * Verifying hypervisor parameters
Tue Jun 28 18:37:07 2016 * Verifying all nodes belong to an existing group
Waiting for job 10 ...
Tue Jun 28 18:37:07 2016 * Verifying group 'default'
Tue Jun 28 18:37:08 2016 * Gathering data (2 nodes)
Tue Jun 28 18:37:09 2016 * Gathering disk information (2 nodes)
Tue Jun 28 18:37:09 2016 * Verifying configuration file consistency
Tue Jun 28 18:37:09 2016 * Verifying node status
Tue Jun 28 18:37:09 2016 * Verifying instance status
Tue Jun 28 18:37:10 2016 * Verifying orphan volumes
Tue Jun 28 18:37:10 2016 * Verifying N+1 Memory redundancy
Tue Jun 28 18:37:10 2016 * Other Notes
Tue Jun 28 18:37:10 2016 * Hooks Results
Node              DTotal DFree MTotal MNode MFree Pinst Sinst
gnt-1.example.sci 101.2G 82.2G   3.9G  1.5G  2.4G     0     0
gnt-2.example.sci 101.3G 81.3G   3.9G  1.5G  2.4G     0     0
If all is ok, proceed with sci-setup sci
Create the controlling virtual machine
On the first node run
sci-setup sci
If you wish that the internal cluster's DNS will use your company's DNS as the forwarders (i.e. ask them to resolve external Intternet addresses), then run ttis command in the following way:
sci-setup sci -d
Without -d the internal cluster's DNS will resolve the internet addresses directly via root Internet servers.
The configuration wizard will ask you to specify the address of controlling virtual machime in the LAN:
root@gnt-1:~# sci-setup sci
Set sci LAN IP or enter "none" and press ENTER:
Specify any free static IP in the LAN (192.168.11.2 in the example above).
After all checks will succeed, the wizard will print the controlling VM configuration parameters:
Creating service machine sci
IP: 10.101.200.2 on backbone
Second network device: lan
Second network IP: 192.168.11.2
Proceed with sci VM creation [y/n]?
If all is right, enter "y" and press ENTER to create VM.
Adding sci to /etc/hosts
Tue Jun 28 18:44:02 2016 * creating instance disks...
Tue Jun 28 18:44:09 2016 adding instance sci to cluster config
Tue Jun 28 18:44:13 2016  - INFO: Waiting for instance sci to sync disks
Tue Jun 28 18:44:13 2016  - INFO: - device disk/0:  2.10% done, 2m 27s remaining (estimated)
Tue Jun 28 18:45:13 2016  - INFO: - device disk/0: 39.90% done, 1m 31s remaining (estimated)
Tue Jun 28 18:46:14 2016  - INFO: - device disk/0: 78.20% done, 34s remaining (estimated)
Tue Jun 28 18:46:48 2016  - INFO: - device disk/0: 100.00% done, 0s remaining (estimated)
Tue Jun 28 18:46:48 2016  - INFO: Instance sci's disks are in sync
Tue Jun 28 18:46:48 2016 * running the instance OS create scripts...
Tue Jun 28 18:49:42 2016 * starting instance...
Congratulations! You have just create the first virtual machine in your cluster!
After statting, sci VM automatically issue the finetuning procedures of a cluster nodes and becomes the DNS server for them. This operation takes about 5-10 minutes.
Try following commands:
gnt-instance list
gnt-instance info sci
gnt-cluster verify
ssh sci
Operation
How to control the cluster and how to create the new virtual machines read OPERATIONS